
Installing WordPress Step-by-Step: The DIY Guide for Professionals
Once you’ve selected your domain and hosting, you’re ready to take the most exciting step — installing WordPress and seeing your website come to life.
For many professionals — whether you’re a lawyer building your firm’s profile, a dentist creating an online booking site, or a consultant setting up a service catalog — this stage might sound technical. But don’t worry. With today’s hosting tools, installing WordPress is incredibly simple and doesn’t require coding knowledge.
In this guide, we’ll walk you through both One-Click and Manual installation methods, so you can set up your site exactly the way you want — quickly, safely, and confidently.
If you’re new to WordPress, we recommend reading our first tutorial, What is WordPress and Why It’s Perfect for Professionals, to understand the platform’s purpose before proceeding with the setup.
1. What You’ll Need Before Installation
Before you begin installing WordPress, make sure you’ve already set up your domain and hosting for your WordPress website — it’s the foundation of your online presence.
Before you start, keep the following ready:
✅ A domain name (e.g., drmeera.in or advocatesharma.com).
✅ A hosting account that supports PHP and MySQL (almost all WordPress hosts do).
✅ Your login details for the hosting control panel (usually cPanel or a custom dashboard).
✅ A bit of patience and curiosity — that’s all!
💡 Tip: If you purchased hosting like Bluehost, Hostinger, or SiteGround, WordPress is pre-integrated, and you can skip directly to the One-Click Install section below.
2. Option 1: One-Click WordPress Installation (Easiest for Beginners)
Most modern hosting providers offer a one-click installer for WordPress. This is ideal for busy professionals who want a hassle-free setup.
Step-by-Step Guide
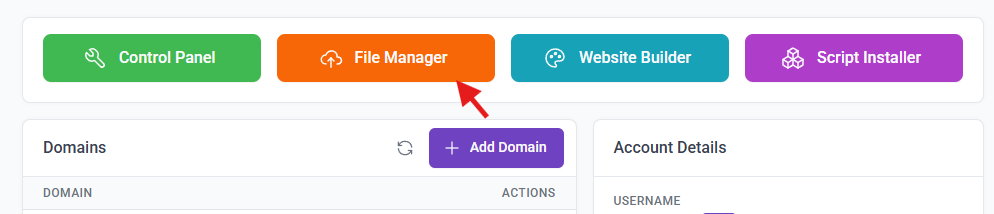
Step 1: Log in to your Hosting Dashboard
Look for an option like “cPanel”, “Dashboard”, or “Control Panel.”
Step 2: Find the WordPress Installer
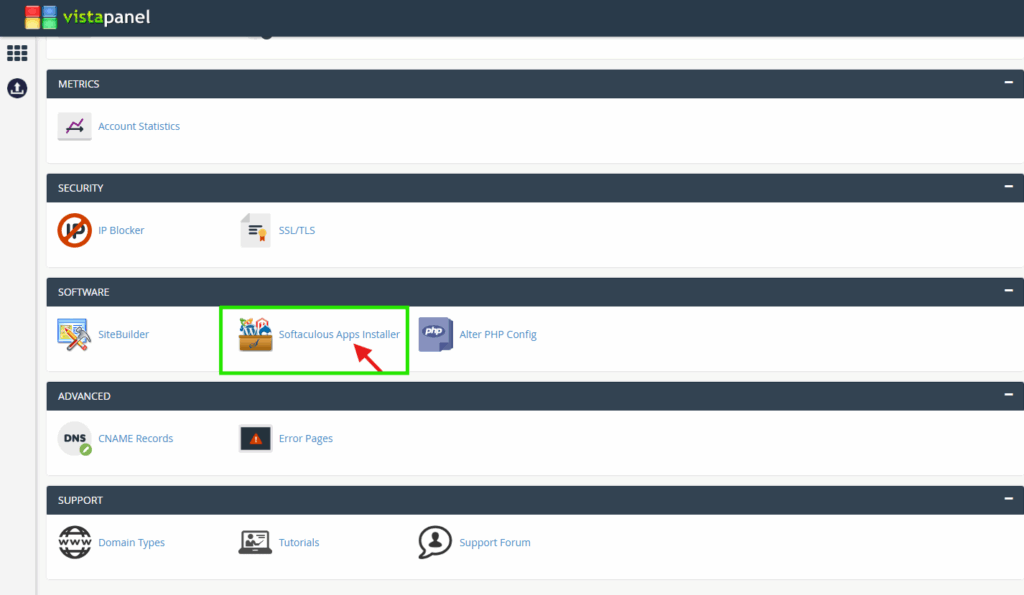
You’ll often see options like WordPress Manager, Softaculous Apps Installer, or Install WordPress.
Step 3: Click ‘Install Now’
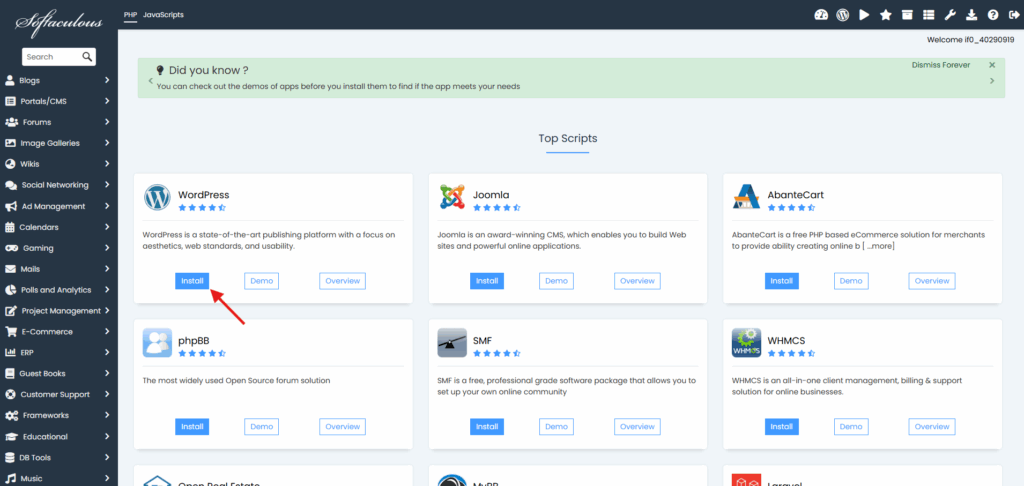
Choose your domain (e.g., www.drmeera.in) from the dropdown list.
Step 4: Fill in the Basic Details
- Site Name: Meera Dental Care
- Site Description: Complete Family Dental Services in Madurai
- Admin Username: Choose something professional (avoid “admin”).
- Password: Create a strong one.
- Email: Use your official address (e.g., [email protected]).
Step 5: Choose Language & Plugins
Default English is fine. Skip optional plugins for now; we’ll cover them later.
Step 6: Click “Install”
Within a minute, you’ll get a success message and your login URL:
👉 yourdomain.com/wp-admin
Step 7: Log in and Explore
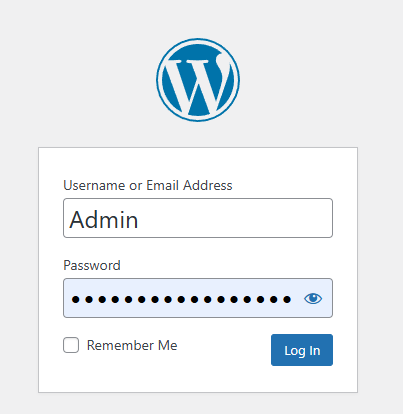
Use your username and password to log in. You’ll see the WordPress Dashboard — your control room for website design, content, and customization.
💡 Pro Tip: Bookmark your WordPress login URL. You’ll use it often.
3. Option 2: Manual WordPress Installation (for More Control)
If your hosting doesn’t provide a one-click installer, or you prefer doing things yourself, you can manually install WordPress in less than 10 minutes.
Step-by-Step Guide
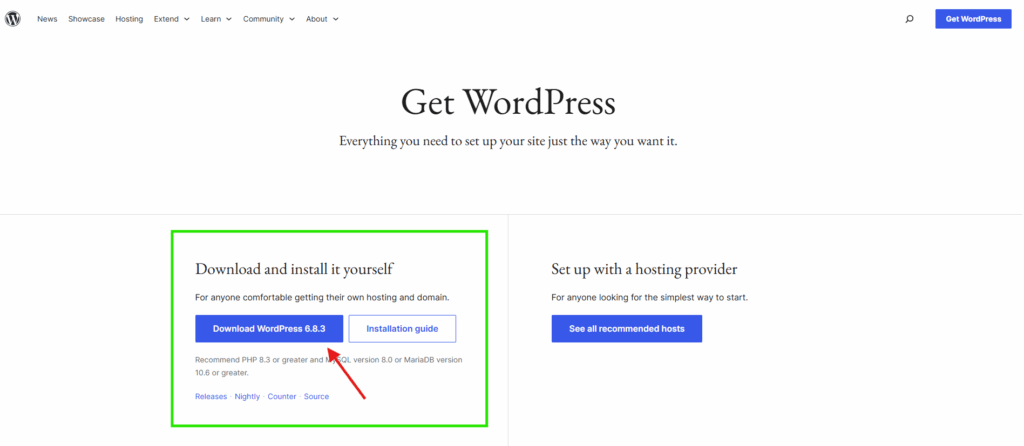
Step 1: Download WordPress
- Go to wordpress.org/download
- Download the latest .zip file.
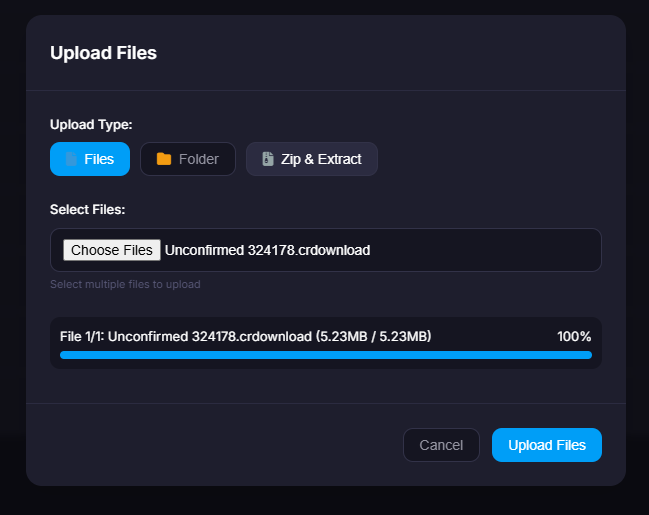
Step 2: Upload WordPress to Your Hosting
- Log in to your hosting’s File Manager or use FTP (like FileZilla).
- Upload the .zip file to your website’s root directory (usually /public_html/).
- Extract the files.
Step 3: Create a Database
- Go to cPanel → MySQL Databases.
- Create a new database (e.g., mywebsite_db).
- Create a database user and password, then assign the user to the database with All Privileges.
Step 4: Connect WordPress to Database
- Visit your domain in a browser (yourdomain.com).
- You’ll see the WordPress setup screen.
- Enter:
- Database name
- Username
- Password
- Host (usually localhost)
- Click Submit → Run Installation.
Step 5: Fill in Site Details
- Site Title: Sharma Legal Associates
- Username: advocateadmin
- Password: Strong password
- Email: [email protected]
- Click Install WordPress.
🎉 Congratulations! You’ve successfully installed WordPress manually.
You can now log in at yourdomain.com/wp-admin to start customizing.
4. Post-Installation Setup (Don’t Skip This)
Once WordPress is installed, take a few minutes to secure and personalize your new site.
A. Change Permalink Settings

- Go to Settings → Permalinks
- Choose Post name for clean URLs (e.g., yourdomain.com/services/).
B. Delete Sample Content
Remove default posts like “Hello World!” and sample pages.
C. Set Site Timezone and Title
Under Settings → General, ensure your timezone and title are correct.
D. Install an SSL Certificate
- If your host doesn’t automatically enable SSL, go to the hosting dashboard and activate “Free Let’s Encrypt SSL”.
- Ensure your site loads as https://yourdomain.com.
E. Create a Backup

Use plugins like UpdraftPlus or Jetpack to keep automatic backups.
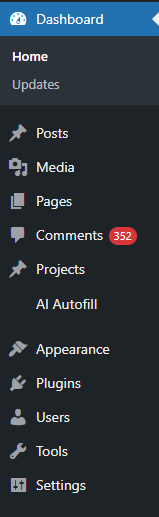
5. Understanding the WordPress Dashboard
Let’s take a quick look at your new dashboard:
- Posts – For blogs or articles.
- Pages – For static content like Home, About, Services.
- Appearance → Themes – Where you change design layouts.
- Plugins – Add extra functionality like SEO, security, or contact forms.
- Settings – Manage core site preferences.
💡 Pro Tip: Don’t install too many plugins at once — it slows your website. Start with essentials only (we’ll cover that in a later article).
6. Troubleshooting Common Issues
- White Screen or 500 Error: Reinstall WordPress or disable faulty plugins via FTP.
- Login Page Not Working: Clear cache or reset password from the database.
- Site Not Secure: Reissue SSL from your hosting panel.
- Slow Dashboard: Use caching plugins or check server performance.
These small steps ensure your site runs smoothly from the start.
7. Why DIY Installation Matters for Professionals
When you installing WordPress yourself, you gain control over your website’s foundation. You understand how your site works, where it’s hosted, and how to make small updates confidently.
For professionals, this control translates into independence — no waiting for a developer for simple changes. You can update content, add new services, or post announcements anytime.
Once your site is up, the next step is learning how to navigate the dashboard and customize your theme — we’ll cover that in the next tutorial.


")


0 Comments