Create the Plugin Skeleton – “Hello Woo Checkout”
In this chapter, we’ll create a real WordPress plugin that WooCommerce can use. By the end, you’ll have:
- A proper plugin folder and main file
- A clean naming convention to follow
- A working “Hello from our plugin” message on the checkout page
1. Choose a Plugin Name & Slug
Let’s standardize things from the start.
- Plugin Name (human-readable): Simple Discount Rules for WooCommerce
- Plugin Slug (machine-friendly): simple-discount-rules
We’ll use this slug consistently for:
- Folder name
- Main plugin file
- Function prefixes, constants, etc.
Rule of thumb:
Use kebab-case (lowercase, words separated by hyphens) for folder/file names,
and snake_case with a short prefix for functions (e.g., sdr_).
2. Plugin Folder Structure
Inside your WordPress install, go to:
wp-content/plugins/simple-discount-rules/
Create a folder named:
simple-discount-rules
Inside it, create this basic structure:
wp-content/
plugins/
simple-discount-rules/
├── simple-discount-rules.php ← Main plugin file (required)
├── includes/ ← For additional PHP files (future use)
└── assets/ ← For CSS / JS / Images (optional)
For now, only simple-discount-rules.php is required. The other folders are just planning ahead.
3. Create the Main Plugin File
Open simple-discount-rules.php in your code editor and add this:
Simple Discount Rules Plugin Example
This code shows how to create a basic WooCommerce plugin that displays a custom message on the checkout page.
<?php
/**
 * Plugin Name:       Simple Discount Rules for WooCommerce
 * Plugin URI:        https://example.com/simple-discount-rules
 * Description:       A step-by-step tutorial plugin that adds custom discount rules to WooCommerce checkout.
 * Version:           1.0.0
 * Author:            Your Name
 * Author URI:        https://example.com
 * Text Domain:       simple-discount-rules
 * Requires at least: 6.0
 * Requires PHP:      7.4
 */

if ( ! defined( 'ABSPATH' ) ) {
    exit; // Exit if accessed directly.
}

/**
 * Basic constants.
 */
define( 'SDR_PLUGIN_VERSION', '1.0.0' );
define( 'SDR_PLUGIN_DIR', plugin_dir_path( __FILE__ ) );
define( 'SDR_PLUGIN_URL', plugin_dir_url( __FILE__ ) );

/**
 * Simple check: only run if WooCommerce is active.
 */
function sdr_is_woocommerce_active() {
    return class_exists( 'WooCommerce' );
}

/**
 * Force Classic Checkout (disable WooCommerce Block Checkout).
 */
add_filter( 'woocommerce_blocks_is_checkout_block_enabled', '__return_false', 9999 );
add_filter( 'woocommerce_blocks_is_cart_block_enabled', '__return_false', 9999 );

/**
 * Remove block-theme support.
 */
add_action( 'wp', function() {
    if ( function_exists( 'remove_theme_support' ) ) {
        remove_theme_support( 'woocommerce-block-theme' );
    }
}, 20 );

/**
 * Output a simple message on the WooCommerce checkout page.
 */
function sdr_checkout_hello_message() {

    if ( ! sdr_is_woocommerce_active() ) {
        return;
    }

    $message = __( 'Hello from Simple Discount Rules plugin! This message is coming from your custom WooCommerce extension.', 'simple-discount-rules' );

    echo '<p style="padding: 10px; background: #f5f5f5; border-left: 4px solid #2271b1; margin-bottom: 15px;">';
    echo esc_html( $message );
    echo '</p>';
}
add_action( 'woocommerce_before_checkout_form', 'sdr_checkout_hello_message', 5 );
Why this works: the add_filter( ‘woocommerce_blocks_is_checkout_block_enabled’, ‘__return_false’, 9999 ) line tells WooCommerce to stop using the block checkout UI, which then allows woocommerce_before_checkout_form (and other classic hooks) to run.
4. Activate the Plugin
Now go to your WordPress admin:
- Navigate to Plugins → Installed Plugins
- Find “Simple Discount Rules for WooCommerce”
- Click Activate
It won’t do anything yet—but if activation works without errors, your skeleton is correct.
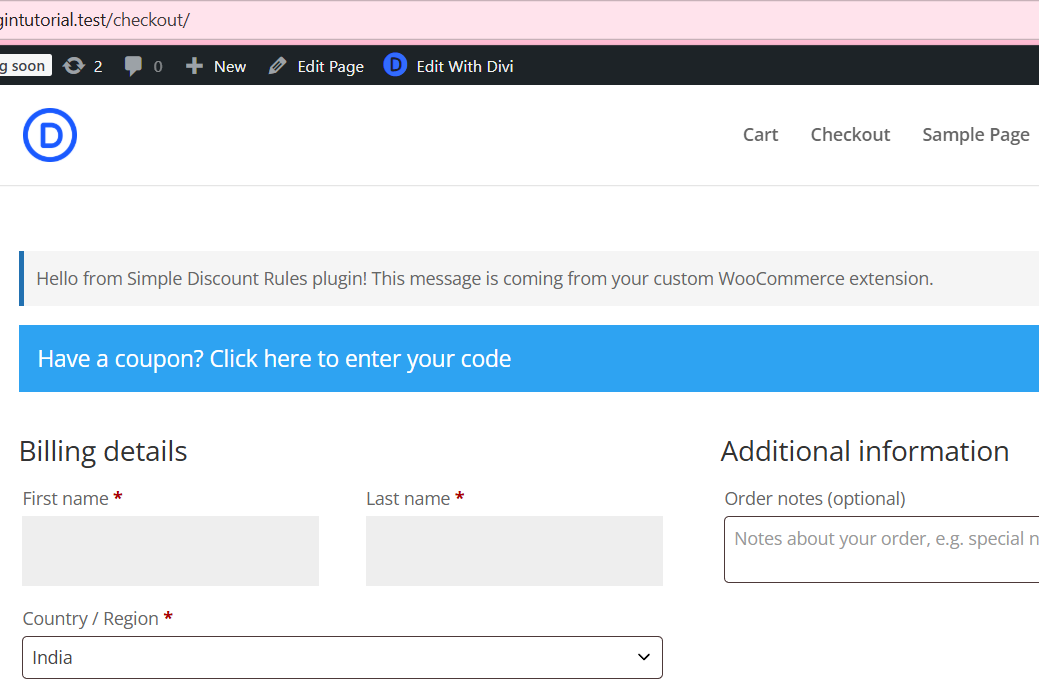
5. Test the checkout message
- Make sure WooCommerce is installed and active and you have at least one product.
- Add a product to the cart.
- Visit the Checkout page (
/checkout/). - You should see the styled message at the top of the checkout form:
If you still don’t see it:
-
Clear browser and site caches, then reload.
-
Confirm the checkout page contains the classic
[woocommerce_checkout]shortcode (if you manually edited the page). -
Confirm plugin is active and WooCommerce is active.
If you deactivate the plugin and refresh checkout:
- The message should disappear
- That confirms the hook lives inside your plugin.
7. Summary of What We’ve Done
By the end of Chapter 1, you now have:
- A proper plugin folder and file structure
- A clear naming convention (slug, file names, function prefix)
- A main plugin file with header and basic constants
- A working “Hello Checkout” message injected via a WooCommerce hook
In the next chapter, we’ll:
Add an admin settings page under WooCommerce so we can customize this checkout message from the dashboard instead of hard-coding it in PHP.